
4.28.2011
4.27.2011
memorable box !
my friend's idea :)
She always has the best intentions of scrapbooking but at last all the pictures end up sitting inside a box.so,she just thinking why not make up one pretty box !
 This would be also a nice gift for your friends.This way they have a place to keep all the fun little memories throughout the whole journey of life :)
 first,she bought a paper mache box from a craft shop.Once she had her box,she measured it and cut the paper to the right size she wanted.She used the spray glue to stick on the paper.She decorated the box with stamps,stickers and hand words !
 Feel free to coordinate the box colors and designs just the way you love.here some ideas for what you could put in your pretty box :)
#ultrasounds (such pictures and DVDs)
#shower invitations
#pictures
#gift lists
#notes
and many more ^^
I hope this inspires you to make up one either for a gift or just for yourself.Reward your own self ;)
and...................enjoy also our updated craft handbags here.peace!
leave your comments and subscribe us!
-zarith-
She always has the best intentions of scrapbooking but at last all the pictures end up sitting inside a box.so,she just thinking why not make up one pretty box !


#ultrasounds (such pictures and DVDs)
#shower invitations
#pictures
#gift lists
#notes
and many more ^^
I hope this inspires you to make up one either for a gift or just for yourself.Reward your own self ;)
and...................enjoy also our updated craft handbags here.peace!
leave your comments and subscribe us!
-zarith-
4.25.2011
The art and craft movement !
The term craft is often used to describe the family of artistic practices within the family decorative arts that traditionally are defined by their relationship to functional or utilitarian products (form in vessel tradition) or by their use of such natural media as wood,clay and textile.
Craft practised by independent artists working alone or in a small group (often referred to as studio craft).Studio craft includes studio pottery,weaving and wood working.
The fact,craft is actually to be described as lying somewhere between an art(which relies on talent) and a science(which relies on knowledge).In this sense,the english word 'craft' is roughly equivalent to the ancient Greek therm 'techne'
So,this historical story of craft made craft well known by people nowadays !
Lets check out what craft we've for you at our crafthandbags blogshop :)
have a lovely day !
tq
4.23.2011
what girls can do :)
ready for the toturial ?
here you go ,
you need:
1.fabric for bracelet
2.fabric or ribbon for flower portion
3.beads or pearls and a piece of chain
4. 27″ of 3/8″ elastic
5.snap
first thing first ,
cut 2 strips 18" long out of the strips you just tore


here you go ,
you need:
1.fabric for bracelet
2.fabric or ribbon for flower portion
3.beads or pearls and a piece of chain
4. 27″ of 3/8″ elastic
5.snap
first thing first ,
cut 2 strips 18" long out of the strips you just tore
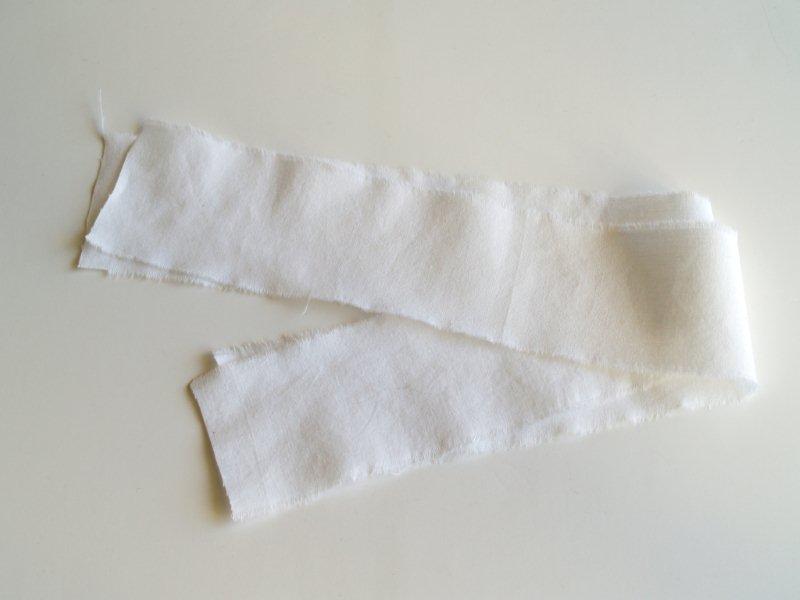
Lay your strips together and sew a seam 1/4″ away from each raw edge.

Sew two more seams 5/8″ away from the outside seams.

Cut three pieces of elastic, each 9″ long. This should fit around your wrist comfortably with about 1″ overlap. If you need to, adjust the measurements of your elastic.
Sew a small seam right inside the edge of the top casing only. You should not be sewing over the elastic. It should be just on the other side of the seam.
Move the needle over and sew a second seam, using your presser foot as a guide along the first seam. This should sew down the elastic. Repeat a third time.
Move the needle over and sew a second seam, using your presser foot as a guide along the first seam. This should sew down the elastic. Repeat a third time.

Pull the elastic the rest of the way through the casing, and sew the three seams on the other edge.

Repeat with the other two casings and the remaining pieces of elastic.

Put all four snaps in. The two on the right side should face down and the two on the left should face up.

For the flower part of the bracelet I used 1 1/2″ strips of linen. I folded them so that they resembled a flower, with folds that were gradually smaller towards the center.

Sew on your beads, pearls and chain. I tried to keep the larger pearls towards the center, the smaller beads towards the outside.Sew your flower piece to the outside of the gathered bracelet piece.

All done!! What do you think?
give a try dears.
check out also our collections at mycrafthandbags
thanks all ;)
4.21.2011
handmade hair clips

1.modelling clay (available at art shops)
2.silicone flower mould
3.hair clip backings
4.hot glue gun
5.baking paper
6.oven tray and oven
6.oven tray and oven
instructions :

2.press firmly into mould.Making sure there is no overhang and the surface is flat.

-carefully move the flower

-remove from oven and allow to cool completely
-place a small dab of hot glue onto the clip's glue pad

-gently press down

make a try!
-zarith-
4.19.2011
i LOVE you ;)
a big big thanks to my customers !
i heart all of you ;)
and this song dedicated to all my customers .hihi
thank you !! xoxo
peace :)
4.18.2011
quilted PINCUSHION toturial

- 2 quilted squares measuring 4" x 4"
- Walking Foot
- Polyester or wool batting scraps or fiberfill or trimmings from your last haircut
- Embroidery Floss
- Variety of Decorative threads
- Hand embroidery needle

Here's a tip I learned from my Grandma years ago: next time you get a hair cut, ask if you can sweep up the trimmings. Save these and put them in your pincushions! The natural oils in your hair will keep your pins from rusting.

then,Binding with embroidery floss.
Here's what it should look like when the full pincushion is encased with embroidery floss ;)

enjoy :)
dont forget to purchase with us at our crafthandbags ..our pleasure.
-zarith-
Subscribe to:
Posts (Atom)